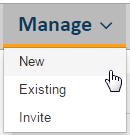
The user creates new events, searches existing events, and invites new suppliers to register under the Manage tab.
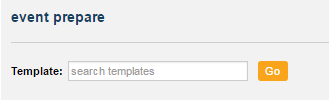
Select Manage>New to create an event. Use the search bar to find the correlating template to the event, or select 'Go' to see all active templates.
The user completes the event header. Note the red asterisk indicates that the field is required. After all event header information is complete, select the 'Update' button.

- Event ID/Name: Identifiers for the event. Event ID and Name both need to be unique.
- Due By Date/Time: Indicates the deadline for supplier responses
- Sealed Event: Determines if the awarding user must wait to open submitted responses for a date specified. If checked, the Sealed Until Date and Time must be populated. The Sealed Until Date and Time cannot occur before the Due By Date and Time.
- Effective Start/End Date: Indicates the length of time the results of the event will occur with the supplier (i.e. contract, project, construction)
- Event Terms and Conditions: Terms and Conditions specific to the event (optional)
- Terms and Conditions: Terms and Conditions for the Organization selected at the Administrative level
- Attachments: Header level attachments that the supplier can view
- Invitation Type: Invitation Only allows the event creator to select suppliers when publishing. Open Invitation allows all suppliers within the ESM supplier community to respond.
- Display Awardee: Determines if non-awarded suppliers can view the awarded supplier
If the entity is configured to allow for suppliers to submit response terms based on event, the selection will be visible in the event header upon event creation.

Review the sections in the template using the left panel with the capability of adding, editing or deleting. Clicking the trash can icon deletes the highlighted section. The plus sign allows the user to add a section from the library, or add a new section entirely. Newly created sections are saved to the event only; they are not added to the Event Library.

Click on a section within the left panel to edit/delete. As a best practice, system administrators may require changes on the template for the event specifically. To make a change, select the 'Edit' button.

The user can update 'Item 1', 'Item 2', etc. to their desired results. Event-specific changes are saved to the event only; they are not saved to the Event Library.

After all appropriate changes for the event are completed, the user can either assign section values (not required), or publish to the suppliers using the Next Step drop-down menu. Here, the user can also print the event or copy to make a new event.

If assigning section values, the total section value needs to be equivalent to 1000. Sections are weighted according to the user’s discretion, but users can select the 'Distribute Evenly' button to allocate equal weights across sections. Select 'Display' or 'Hide' to determine the supplier's visibility to sections values.
Section weights do not apply to Content Only sections, as suppliers do not enter responses for these sections. If sections are nested, the weight value is applied at the highest section level. (For example, if Section 2 has subsections 2.1, 2.1.1 and 2.1.2, the weight is assigned to Section 2 and applies to all of its subsections.)

After selecting Publish in the Next Step drop-down menu, the event will be published for all suppliers if the event is an open invitation. If the event is invitation only, users search for suppliers using the provided search criteria. To display all search criteria, select 'Advanced Search'. Distribution Lists are selected suppliers by system administrators for specific types of events.
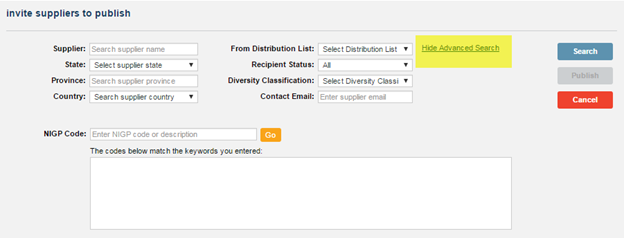
If unable to find a certain supplier, enter the email to invite the supplier to register for ESM Sourcing.

Select 'Add' on the unassigned suppliers (search results) to move the supplier to assigned suppliers. The user can also add all on the current page, or add all.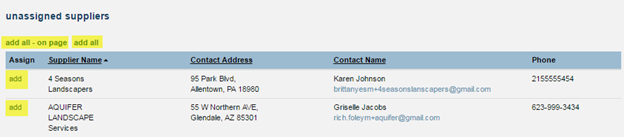
If a supplier needs to be removed from the Assigned Suppliers section, the user can select the Remove button. The Remove All – On Page and Remove All options can be used to quickly remove multiple suppliers from the Assigned Suppliers section.
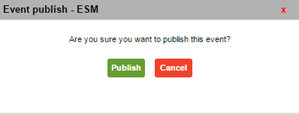
When all required suppliers are assigned, the user selects 'Publish' at the header or bottom of the page. Then, confirm by selecting Publish.
Comments
Please sign in to leave a comment.