Supplier Management
This document provides information on multiple methods for system administrators to manage supplier records.
It is also available at the bottom for download.
General Settings
Individual supplier records can be setup and modified manually via General Settings.
Navigation: Menu > Admin > Select Function > General Settings > Add/Edit Supplier
Step 1: Enter supplier name.
Step 2: Enter required fields.
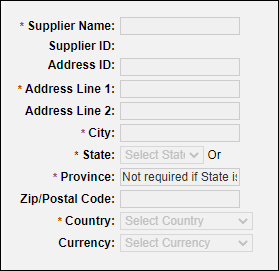
The following fields are required:
- Supplier Name
- Address Line 1
- City
- State (or Province)
- Zip/Postal Code (US only)
- Country
Tips:
- Foreign country (non-US) records cannot contain a State value and must contain a Province
- When a supplier provides an email address for electronic order submission, after entering the PO Email field value, select the Verify button to send a validation email to the supplier. Once the supplier responds to the validation email, the supplier may be sent electronic orders.
- If integrated with an ERP/GL system, the Supplier GL Code field value must match the ERP/GL system's supplier number/ID value. Additionally, if the ERP/GL integration provides supplier data synchronization, it is recommended that supplier records not be added or deleted directly in ESM, but rather through the data synchronization process only.
- If multiple address/location records need to be added to a supplier record, select the Additional Addresses The Address ID field value must be unique.
- If supplier classification information needs to be added to a supplier record, select the Business Classification option, which requires the Classification Name, Classification Authority, Certification Number and Expiration Date fields to be completed.
- To deactivate a supplier record, select the Deactivate Supplier To reactivate a supplier record, un-check the Deactivate Supplier checkbox.
Step 3: Select the Update button to save.
Import Management
Individual and multiple supplier records can be setup and modified via Import Management settings.
Navigation: Menu > Admin > Select Function > Import Management > Import Templates
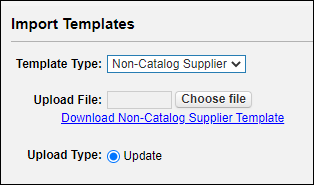
Step 1: Select “Non-Catalog Supplier” from the Template Type field.
Step 2: Download the Non-Catalog Supplier Template.
The following fields are required:
- Supplier Name
- Address Line 1
- City
- State (or Province)
- Zip/Postal Code (US only)
- Country
- Supplier Contact (First Name, last Name & Phone)
Step 3: Create/Save the Non-Catalog Supplier data file.
Step 4: Select the import parameters and the Non-Catalog Supplier data file.
Tips:
- Select Update to update all matching supplier records in the system with the data in the file. This will not affect records not included in the file.
- Imported data files are processed nightly.
- An SFTP data import process is available to allow supplier data to be automatically updated via a nightly batch process.
Step 3: Select Update to start the import process.
Comments
Please sign in to leave a comment.